ShopDreamUp AI ArtDreamUp
Deviation Actions


Suggested Deviants


Suggested Collections


You Might Like…


Description
Comments
I've had a few people ask why I don't allow comments - and given the content of my recent journals I thought I should explain before I look like a hypocrite! I always like to respond to feedback that I receive - and I'm always grateful when I have the time to reply to each person, even if it is a generic message. But as school has moved on that has become more difficult to do. I reached a point last year when I was spending too much time replying to my own work - I was missing out on the work of others which was the main reason why I joined this site. I'd rather be commenting on work that doesn't belong to me and learning through the creations of other artists. But, and this is a big 'but' - I still like to receive feedback. As a photographer I still have a lot to learn and I'd really like to hear what you think of my work. If you have any critiques please send me a note - I'd be more than happy to read it and consider your ideas / input!
The Location
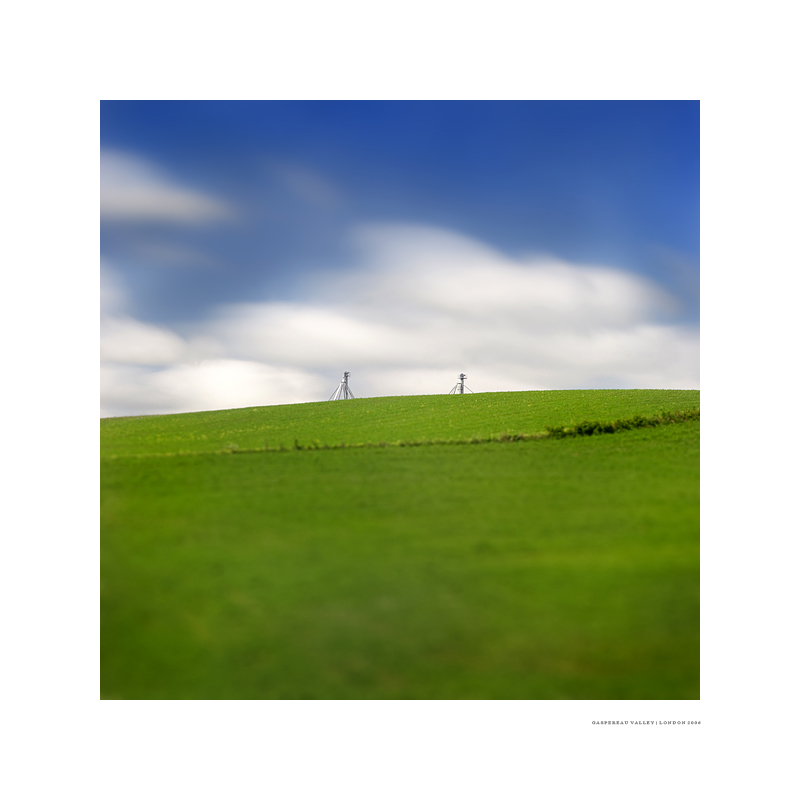
This is a bit of a departure from all of my recent coastal work - but I do like the change! This shot gave me a chance to experiment with the ND filters on a typical landscape where my main goal was to capture the movement of the clouds as they travelled along the horizon. This photo was captured on the northern slope of the Gaspereau Valley in Nova Scotia. Breaking above the horizon and standing in front of the clouds are the tops of two grain silos - the farm they are attached to lies behind the crest of the hill. The sun was very intense that afternoon and the colours of the sky / ground were very lush and saturated.
The Photo
Compared to other long exposure shots I've captured, the set-up for this was pretty simple. An article that covers the different filters I've used can be found here: [link]
As I mentioned above - the main goal was to experiment with cloud movement over a landscape instead of a waterscape. My 10-22mm was too wide to capture this scene so I had to use the 50mm. I wish I had a telephoto for more flexibility but for now I'll have to make do with what I have! Oh money . . .
It took a few captures to get the exposure just right - I wanted as much cloud movement as possible and I was able to find a nice balance with an aperature of f16 and a shutter speed of three minutes. One thing I forgot is that no matter how much I stop the 50mm f1.4 down, it still seems to let in more light than the 10-22mm!
The following is a step-by-step process of how the photo was captured;
 When taking photos of waterscapes I'm always racing against the tides to set-up and properly expose a frame. With this photo I had all the time in the world to find the right angle to shoot at. Framing the scene was by far the easiest thing to do.
The second thing to do was focusing. A key step is to find your focal point before you start to put filters on - it makes the process that much easier. I focused on the tops of the grain silos, letting the focus taper off towards the bottom of the frame.
The third thing to do was attaching the polarizer (made by Tiffen), a filter used to cut reflective light on shiny surfaces and in the sky. In this case I wanted to intensify the blue in the sky and the green grass - twisting the polarizer about 1/2 of a full turn gave me the desired effect. The sun was very intense and during a couple of my earlier test shots I had a few blown highlights (in the clouds) on my camera's histogram. A great tutorial on histogram use can be found here: [link]
While I'm not concerned with creating the 'perfect histogram', I've found that it is a useful tool when I'm out in the field and can't see the finer detail on my LCD. It's nice to have information in the highlights and shadows when you bring a photo into an editing program - because it is a flexibe image you have more to work with and can 'push' or 'pull' a photograph more without losing detail at the extremes.
After the polarizer was mounted and I had found the desired setting I attached a Hoya ND400 filter on top. This filter works to cut all available light - reflective and non-reflective. This was one of the first times I've used an ND400 - it has the ability to cut light to 1/500th of it's original intensity (allowing for longer exposures than the ND8x I've been using previously). The nice thing about an ND filter is that it gives you more control over your aperature / depth of field.
The third filter to be mounted on the lens was a Hoya ND8x - less powerful than the ND400, but it works in the same manner. When I combine the two filters the amount of light blocked at any given moment is greater then when a single ND filter is attached.
The second last step was to attach the TC-80N3 remote timer. I put the camera on full manual mode and set the aperature to f16 and the shutter speed to 180 seconds (3 minutes).
The last step was to adjust the contrast / saturation levels in the camera. I was shooting RAW files but I wanted to do as much processing in the camera as possible. My best results were with the contrast and saturation bumped up two spots.
Photoshop Work
When I was setting up the camera I knew right away that this would be a great photo to apply a tilt-shift effect to. Although I would like to buy a tilt-shift lens, they cost almost as much as a new camera - so while I'm saving up I'll be following the Photoshop tutorial below;
[link]
Tilt-shift photography is a great way to play with perspective and the imagination of the viewer - if you haven't tried it give it a shot. It doesn't work with every image but it can be fun when you find the right scene to experiment with. In this case it allowed me to isolate the grain silos even more and create the illusion that we're looking at a model scene (especially given the detail in the bushes).
After the tilt-shift processing I cropped the image to a square frame and increased the level of contrast by +10 under the Brightness / Contrast command. After reducing the size of the image I used the un-sharp mask command to bring out detail along the horizon.
Tools
Canon EOS 20D | Canon f1.4 50mm | ISO 100 | f16 | Shutter: 3 minutes (180 seconds) | Canon TC-80N3 Remote Timer | Tiffen Polarizer | Hoya ND400 Filter | Hoya ND8x Filter | Manfrotto 190CL Tripod |
I've had a few people ask why I don't allow comments - and given the content of my recent journals I thought I should explain before I look like a hypocrite! I always like to respond to feedback that I receive - and I'm always grateful when I have the time to reply to each person, even if it is a generic message. But as school has moved on that has become more difficult to do. I reached a point last year when I was spending too much time replying to my own work - I was missing out on the work of others which was the main reason why I joined this site. I'd rather be commenting on work that doesn't belong to me and learning through the creations of other artists. But, and this is a big 'but' - I still like to receive feedback. As a photographer I still have a lot to learn and I'd really like to hear what you think of my work. If you have any critiques please send me a note - I'd be more than happy to read it and consider your ideas / input!
The Location
This is a bit of a departure from all of my recent coastal work - but I do like the change! This shot gave me a chance to experiment with the ND filters on a typical landscape where my main goal was to capture the movement of the clouds as they travelled along the horizon. This photo was captured on the northern slope of the Gaspereau Valley in Nova Scotia. Breaking above the horizon and standing in front of the clouds are the tops of two grain silos - the farm they are attached to lies behind the crest of the hill. The sun was very intense that afternoon and the colours of the sky / ground were very lush and saturated.
The Photo
Compared to other long exposure shots I've captured, the set-up for this was pretty simple. An article that covers the different filters I've used can be found here: [link]
As I mentioned above - the main goal was to experiment with cloud movement over a landscape instead of a waterscape. My 10-22mm was too wide to capture this scene so I had to use the 50mm. I wish I had a telephoto for more flexibility but for now I'll have to make do with what I have! Oh money . . .
It took a few captures to get the exposure just right - I wanted as much cloud movement as possible and I was able to find a nice balance with an aperature of f16 and a shutter speed of three minutes. One thing I forgot is that no matter how much I stop the 50mm f1.4 down, it still seems to let in more light than the 10-22mm!
The following is a step-by-step process of how the photo was captured;
While I'm not concerned with creating the 'perfect histogram', I've found that it is a useful tool when I'm out in the field and can't see the finer detail on my LCD. It's nice to have information in the highlights and shadows when you bring a photo into an editing program - because it is a flexibe image you have more to work with and can 'push' or 'pull' a photograph more without losing detail at the extremes.
Photoshop Work
When I was setting up the camera I knew right away that this would be a great photo to apply a tilt-shift effect to. Although I would like to buy a tilt-shift lens, they cost almost as much as a new camera - so while I'm saving up I'll be following the Photoshop tutorial below;
[link]
Tilt-shift photography is a great way to play with perspective and the imagination of the viewer - if you haven't tried it give it a shot. It doesn't work with every image but it can be fun when you find the right scene to experiment with. In this case it allowed me to isolate the grain silos even more and create the illusion that we're looking at a model scene (especially given the detail in the bushes).
After the tilt-shift processing I cropped the image to a square frame and increased the level of contrast by +10 under the Brightness / Contrast command. After reducing the size of the image I used the un-sharp mask command to bring out detail along the horizon.
Tools
Canon EOS 20D | Canon f1.4 50mm | ISO 100 | f16 | Shutter: 3 minutes (180 seconds) | Canon TC-80N3 Remote Timer | Tiffen Polarizer | Hoya ND400 Filter | Hoya ND8x Filter | Manfrotto 190CL Tripod |
Image size
800x800px 205.25 KB
© 2006 - 2024 londonxpress
Comments0
Comments have been disabled for this deviation